
Last week, I wrote about acoustics for the first time in this blog. Everything I wrote about was theory, based on the books I've read, my first-hand impressions of various rooms and arrangements, as many podcast episodes on acoustics as I could find, and an unhealthy number of forum threads digested. However, this week, the rubber meets the road. I finally made substantial headway on the room treatment project I've been putting off for longer than I care to admit. Let me tell you about what I built, where I put it, and how it sounds.
What I Built
In last week's post, I stressed the importance of using absorption to treat the first reflection points in your room. This is exactly where I started. I used Owens Corning 703 rigid fiberglass: a mix of four-inch and two-inch panels, to build six-inch thick broadband absorbers. The panels are 48" by 24", providing for healthily-sized traps and not requiring any cutting. I built a narrow frame of 1x3" common board behind the insulation instead of around it, in order to maximize the effectiveness of the traps. This is a method many overlook, but Nenne Effe does a neat job demonstrating the technique in her video on YouTube. In fact, her method is one of the best I've seen, and I only deviated in a few ways, all mentioned in this post. I even used her technique for achieving tidy fabric corners.
I built four of these traps, with the four-inch panel closer to the listener and the two-inch panel closer to the wall, addressing the theory that using multiple layers of insulation can cause reflections, particularly if adhesive spray is used between the layers. I figure that if reflections occur, traveling through a solid four inches of insulation before the adhesive spray and four inches after reflecting off the adhesive spray should be enough to absorb any frequency high enough to be subject to that reflection.
I blazed my own trail for the looks: I bought the niftiest looking fabric I could find at Jo-Ann Fabrics that was breathable, and I ended up with a product line called Silkessence, which is shiny and silky and breathable and textured and available in a variety of colors. And learning from earlier mistakes, I emphasized the corner edges by using corner guards cut to the depth of the trap, so the corners don't sag very much.
Six-inch traps are pretty heavy, even without a beefy wooden frame covering all the sides. I struggled to find a method to place them at height, ideally with a gap between the traps and the wall, to increase low-frequency absorption. I landed on Ikea's Molger Wall Shelf, one per trap, placed on the floor. For stability, I used "hook and eye" packages from the hardware store, with one side screwed into the upper wooden back of each trap, and the other side screwed into the wall. The hooks-and-eyes are not load-bearing, but just a safety measure to keep the traps from tipping over. The four-inch hook screwed into the one-inch board, and the one-inch eye screwed into the wall, effectively spacing the six-inch traps six inches from the wall, which is about the ideal distance for bonus low-frequency absorption.
Where I Placed Them
I decided to position the traps vertically, to make the most of the vast quantity of 703 fiberglass I bought and the floor space available. This provides effective absorption at the height of a seated guitar player and a standing singer, along with the primary goal of treating at the height of the speakers. And, it was a perfect fit for the height of the Molger shelves from Ikea.
Deciding where the first two traps belong was easy: vertically positioned at the side-wall first reflection points. I used the "mirror trick" to find out exactly where they belong. With the traps as thick as they are, and positioned six-inches from the wall, my sidewalls are now absorbing lower frequencies than my monitors can produce, subwoofers not included. Based on all the theory I've read and learned, sidewall absorption provides the best bang for the buck if you only have a couple of traps to place.
The second two were also easy. If I was only planning to build four traps, I would have put the second pair behind the listener at the first reflection points on the back wall. But since I planned a more extensive acoustic treatment project, I placed them immediately next to the other traps on the side walls, slightly behind the listener. After all, I'm already losing the wall space on the sides, so I might as well make the most of the space that instruments can't fit in due to the first two traps. This also creates a wider reflection-free zone for recording vocals and guitars.
Due to the width of the Molger shelves I'm using as stands, there's a neat three-inch gap between the traps on each wall, small enough to be acoustically invisible at the angle the traps are from the speakers.
Want To See?
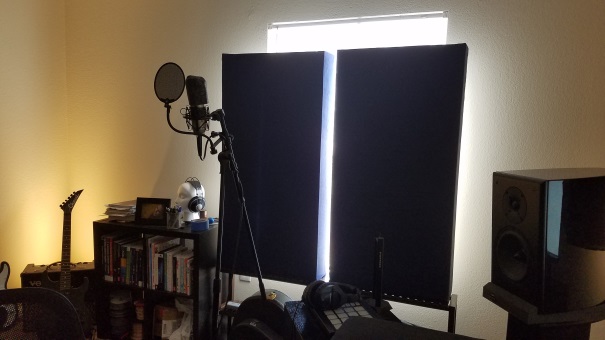
The left wall of my studio space. Thankfully, the gap between the traps lets in a little natural light.
Though I'll still likely require vitamin D supplements.
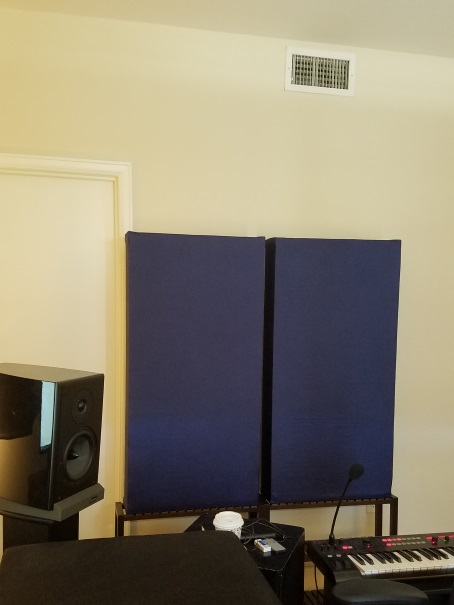
The right wall of my studio.
How It Sounds
My first impression is clarity. Things are just clearer. I hear more detail and definition in every song I play. I'm picking up on new little bits of percussion, and more granular attributes in synths that I had never noticed before. It's the audio-equivalent of cleaning your glasses.
My second impression is stereo separation. Everything is suddenly so wide! In songs with doubled vocals or doubled guitars, the width and power pop more than I'm accustomed to. I'm also realizing synth parts have significantly more stereo interest than I've ever heard before. Not to mention, I'm hearing some panning beyond the speakers in some songs - a neat trick I've never heard from my own system before.
My third impression is clarified bass. Though the traps are placed at the first reflection points, not in the corners, they are still the first elements of low-frequency absorption I have in my room. I can hear noticeably more power in the kick and bass, and more separation between the two. Somewhat subtle, but it's enough to make me smile.
My fourth impression is the depth of the phantom-center. I wouldn't say I'm getting a pinpoint phantom-center, but on many songs, it sounds like the singer is no longer at my screen, but tucked a few feet behind it. This tells me I'm heading in the right direction. I'm not worried about the phantom-center not sounding razor-sharp just yet: after all, I still have the back wall, front wall, and ceiling reflection points to absorb before the listening seat is truly in a reflection-free zone.
And my major takeaway after listening through almost a hundred songs that I previously liked, buried in playlists on Google Music, is that I feel I now have a much better handle on which mixes from songs I love are lacking, and which are fully developed. Some songs now bother me with how the hi-hat frequencies are EQed, or the vocal now sounds problematic, or the entire mix sounds too narrow, or the entire mix sounds too hazy. I'm picking up on a shrill high-end sheen on a lot of digital songs that I'm not enjoying at all. The remarkable thing to me is that these are songs I've heard dozens of times; songs I enjoy. But now, more than ever before, I feel like I know what I don't like about how they're engineered in very defined terms. Or, sometimes, I'm totally blown away by how clear and full and defined things sound, when I'm listening to a great mix.
Final Thoughts
What this means to me is that I now feel I have a secret weapon in assuring that my mixes are solid and that they will translate. Of course, I'll still do reference checks, especially initially after these changes. But I feel like I'm hearing music finally in focus, and I'm now that much better able to do what needs to be done in my own music to make things sound right. And the journey continues: keep reading here to hear about the next stage in my room treatment project.
As I was hoping, I'm observing that acoustic treatment is not only a tremendous upgrade to the monitoring chain of a studio, but a powerful tool in helping one hear what is lacking and what works in an unfinished mix. I recommend everyone reading this blog to consider what options you have for acoustic treatment, so you can take advantage of the benefits too.
And if you are thinking you don't know where to begin, I recommend checking out my previous blog entry, An Acoustic Primer: The Secret to Better Mix Decisions, to get you started.