
Introduction
Whether you're organizing a poorly-labeled mix or editing audio tracks in a production, you'll be able to work a lot faster when you understand what a track is at a glance just by seeing its waveform. This is just one of those skills that help experienced audio engineers do what they do, and do it quickly.
But not everyone has spent a few hundred hours editing audio to have those visuals ingrained in memory. Today's blog post feels like a dry topic, so I'll keep it short. But I hope it helps at least a couple of my readers skip a few steps of tedious learning and level up the efficiency of their work.
The Basic Structure of Your DAW
This probably feels self-explanatory to most of you, but just in case, we'll spend a few moments on the basics.
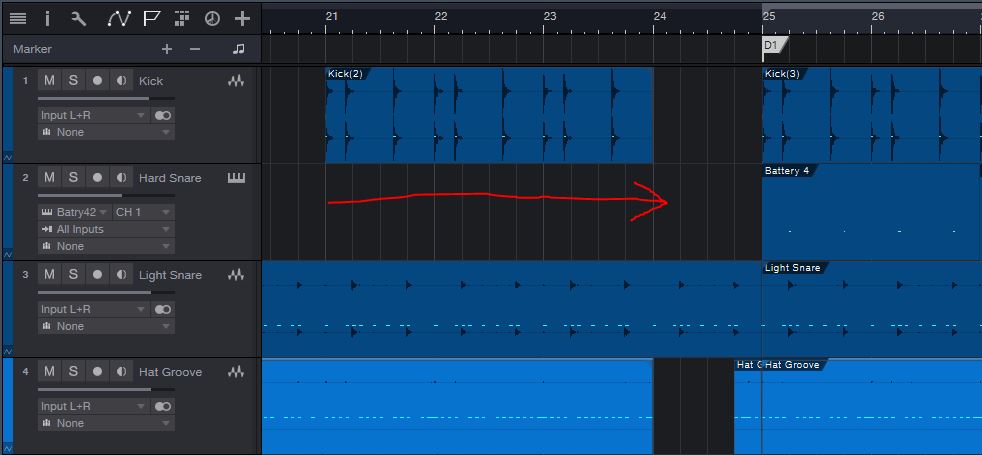
In every common DAW, the tracks are arranged vertically. Each vertical track contains a different instrument or sound. In the image below, you can see separate tracks for Kick, Hard Snare, Light Snare, and Hat Groove.

And in each track, there are clips running horizontally, marking where audio or MIDI exist in the timeline of the song.
Volume Visualized
Amplitude
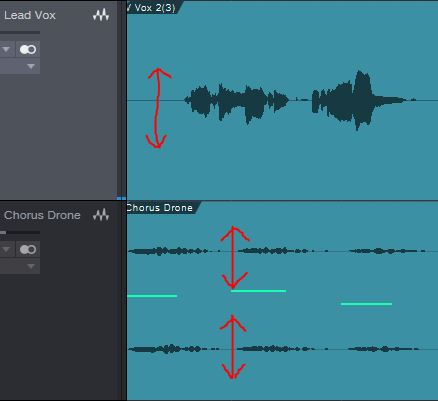
In each audio clip, waveforms (squiggle shapes) mark where sound is present. The taller the waveforms are, the louder the sound is. You can see a single vertical representation for the "Lead Vox" track since it is a mono signal. But because the "Chorus Drone" track originated from a stereo synth, you can see separate vertical volume representations for the left and right channels.
A Quick Note on Gain-Staging
Anytime you record audio from a microphone, you want to keep the gain low on your interface. There is a common misconception that you have to record loud in order to have the recording sound better. But usually the opposite is true: recording at a quieter level keeps your audio a safe distance from clipping and helps preserve momentary transients. If you want to learn more about this, check out the gain-staging section on my guide to better mixes. But in short, my rule of thumb is to never let a recorded signal exceed -15 dBFS.
You may also have experienced that many virtual instruments output ridiculously loud sound. Samples are generally created equally loud. Not only can this clip the instrument itself or plugins in your processing chain, but it will clip the master bus in your DAW unless you have the faders for virtual instruments pulled down very low. My recommendation is to turn down the volume inside each virtual instrument at the time you open it. And you can fine-tune each instrument's level later with the faders in your mixer.
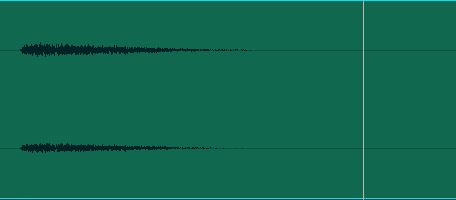
Using Data Zoom
But you'll notice that when you follow proper gain-staging rules like the ones I outlined above, your waveforms look smaller and are harder to identify, such as in this image:
Fortunately, many DAWs offer a zoom tool to enlarge the waveform visuals without actually increasing the volume of the sounds they represent. In Studio One, this is called Data Zoom, and it can be found in the bottom right corner of the primary session view.
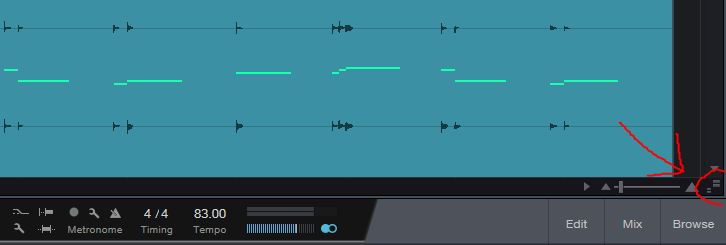
Don't the waveforms look so much easier to read now that I've adjusted the data zoom?

Frequency Visualized
But when you look closely at a waveform, you can see a whole lot more than just how loud it is. Individual waves are wider, with more distance between the peaks and troughs, when the frequency the waves represent is lower. You can see in this blue waveform of a kick drum that the peaks and troughs are far apart. Therefore, the frequency is very low:
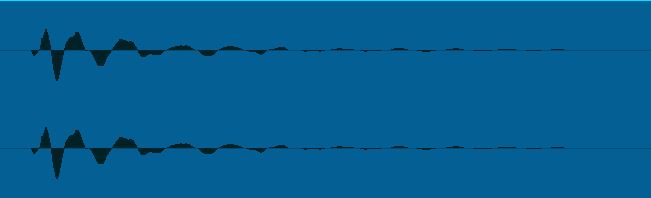
This kick waveform is shown at the same zoom-level as the snare and hi-hat below.
In this green waveform of a snare drum, you can see the waves are much smaller and closer together. This means that the frequency of the sound is higher.

This snare waveform is shown at the same zoom-level as the kick and hi-hat.
You can also note that the snare drum sound begins very abruptly. The beginning of a sound is called the transient, and snare drums are often defined by their sharp transients.
You can use a transient shaper to accentuate or diminish the intensity of transients relative to the sustain of the sound. If I were to use a transient shaper to cut the attack and boost the sustain of this snare, it would give the snare more body and character. Or, I could use the same plugin to boost the attack and cut the sustain, helping the snare drum sound more impactful and enabling it to better cut through a dense mix without perceptually sounding louder than it should.
Below is the waveform of a hi-hat. Because the waves are much smaller and closer together, we can see that the frequency is very high. Also, the rounded start of the waveform shows that this hi-hat has a much softer transient than the snare drum above.
This hi-hat waveform is shown at the same zoom-level as the kick and snare above.
Identifying Instruments by Their Waveforms
In the same way that different instruments sound different, the waveforms of different instruments look different.
Piano
Here is a wide-zoom waveform of a piano:
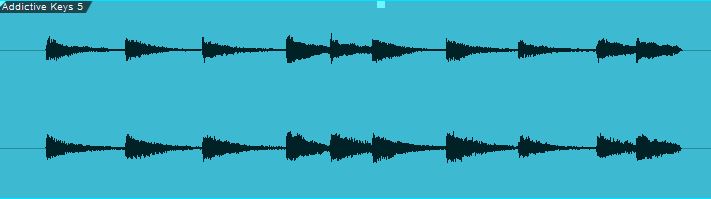
You can see that each chord begins abruptly, and that the sound gently fades until the next chord.
Here is a closer zoom on just one chord of the same piano:
You can see that the sound very gradually falls off. This is very typical for sustained instruments. The waveform of a strummed guitar would look very similar.
Drums
Here, I have the waveform for a drum kit at the same zoom-level as the wide-zoom piano.
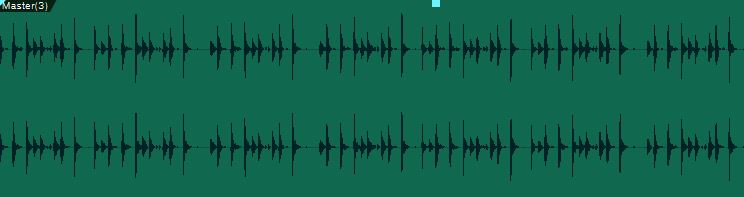
By comparison, you can see that the waveform consists of a bunch of spikes without much sustain. These spikes represent the individual drum hits and the percussive, sharp-transient nature of each sound.
Let's take a closer look:

When you zoom in tighter, you can see the individual drum hits more clearly. We can also visually identify which waveforms belong to which drums:
- This drum groove begins with loud kick drum notes that have a little space between them. Note the fat waves representing low frequency.
- A snare drum follows. We know it's a snare because of the sharp transient, because the waves are tighter indicating higher frequency, and because snare drums are often very loud.
- The kick drum is hit twice again, but this time the hits are softer and closer together.
- At the end of the groove, we can see two soft taps on the hi-hat. They're too small to properly see how tight the waves are at this zoom-level, but the frequency doesn't look low, the transients look rounded, and the hi-hat is generally played much softer than the kick and snare.
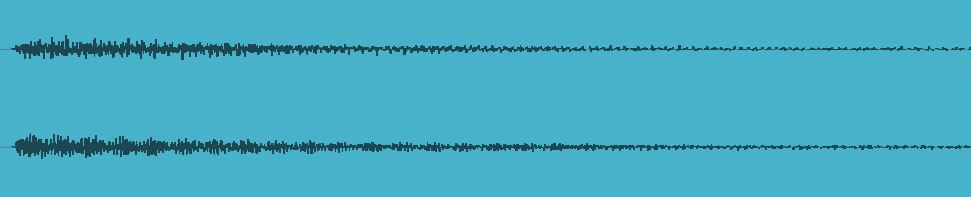
Vocals
Below is the waveform of a singer's vocal phrase, shown at the same zoom level as the wide-zoom piano and drums:

We can't learn a whole lot just from looking at the waveform because the shapes are far more random than the predictable waveform shapes of the piano and drums. And that randomness actually helps us identify it. The human voice can create loud and soft vowels that sustain or even grow in intensity. Vowels can appear medium-low frequency while some consonants appear very high frequency. I explore this much more in my de-essing guide.
It takes more experience to break down what is going on in a vocal waveform. But I can get you started.

- Here we can see a long, sustained vowel that gets softer near the end.
- Here marks a sibilant sound, probably an "S". You can tell because the waveforms are smaller and more tightly packed together.
- After several shorter vowels and softer consonants, we see another sibilant consonant. Possibly an "F".
- At the very end of the phrase, we can see the singer take a soft breath.
Vocal waveforms are the hardest to study, but the more vocal editing you do, the more you'll pick up on the signs to help you find exactly what you're looking for while editing.
Conclusion
Yep, that was a dry one. Studying waveforms isn't very fun. And once you can do it, you can do it. You don't need me to point things out to you.
But for those growing in their experience that want a kick-start in editing audio, I hope today's guide helps you edit more quickly by paying attention to the visual cues in waveforms.